HitFilm Express is a free, professional level video editing software with lots of nice effects. This article will show you how to get started.
The video above will give you a quick overview to HitFilm express. To learn the ins and outs of HitFilm, the HitFilm Express for Beginners training is a good course to learn.
Update August 2022 - I’ve closed the HitFilm Express training till further notice. I have other video courses if you are interested.
Download and Setup
Before you download HitFilm Express, check the hardware specifications required to run it. It may not work if you computer specification is not up to par.
You can download HitFilm Express here. You need to share it on any one of your social media platform in order to register for a download. _By the way, tha_t is a great way to promote a product.
Startup Screen
Once you start HitFilm Express, this is the interface you will see.
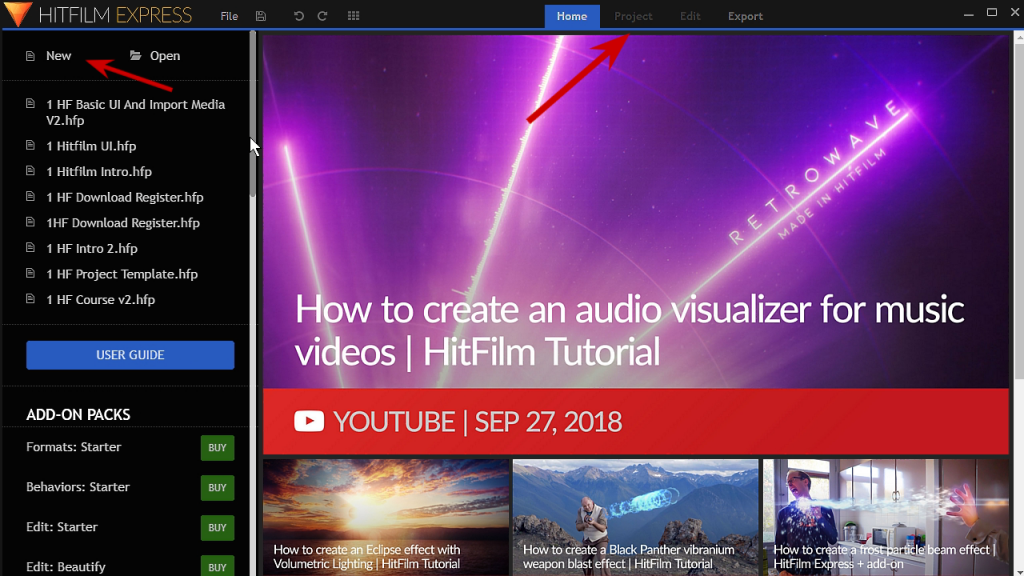
Once you click on New, it takes you to the Project Settings page.
Project Settings
The project settings allows you to set your project settings like resolution, aspect ratio, framerate, audio sample etc. There are common settings for example 720p, 1080p at different framerates or fps presets that you can use.
You can also create your own Custom settings. If you are unsure, just select 1080p. When you import your first video clip into HitFilm later, it can detect the settings of your video footage.
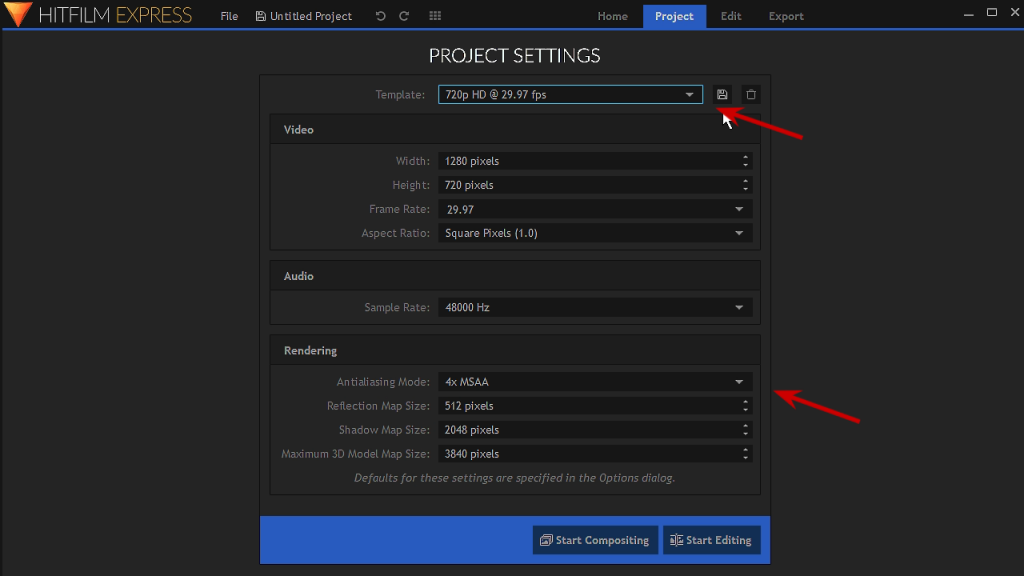
It is safe to just use the default. For Rendering settings, the lower down you select on the menu, the higher the quality of your video output when you render.
User Interface
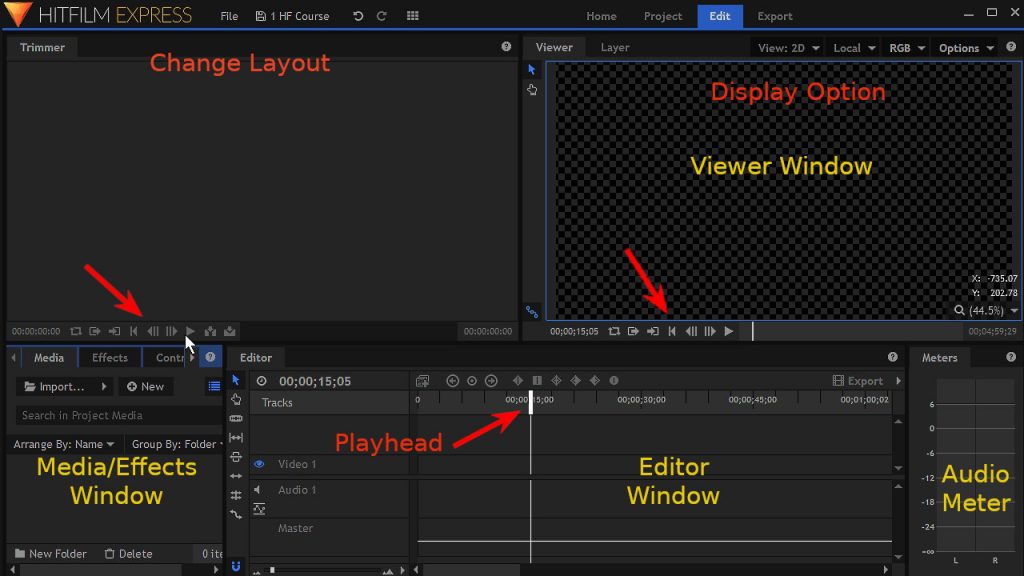
In the image below, you see the default layout. There are several layout preset. To change the layout, click on the Workspace button just above the Trimmer window.
Media/Effects Window
Starting clockwise from the bottom left of the image below, the media window is where you import media including video clips, audio clips, and images.
To import media, click on Import in the Media window. Another method to import media is to select files from your computer, drag and drop them into the media window.
Trimmer Window
Selecting a video clip in the media window will display it in the Trimmer window. The Trimmer allows you to trim your clips before you place them onto the editor Timeline.
After you have trimmed your clips, you can drag and drop them in the Timeline.
Viewer Window
The Viewer displays what is on the Editor window.
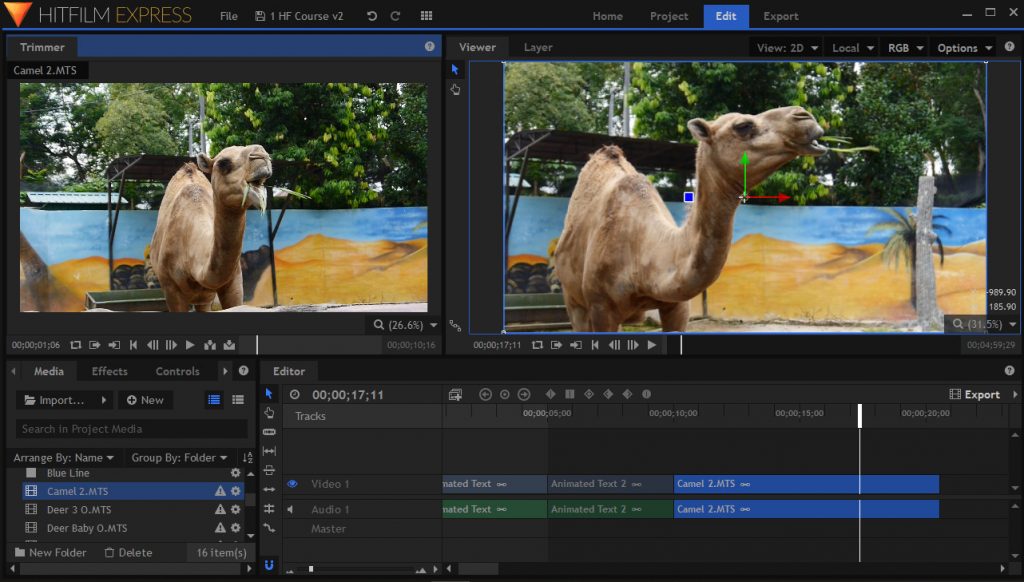
HitFilm Express with media in the Trimmer, and Timeline
Each window has its own tools in the Tool bar. In the Trimmer and Display windows are the home, previous frame, next frame, play-pause, set in and out point tools.
The Editor window has 2 menu bars. The horizontal menu sets keyframes. The vertical menu contains tools for selection, drag, slice, ripple, snapping tool, etc.
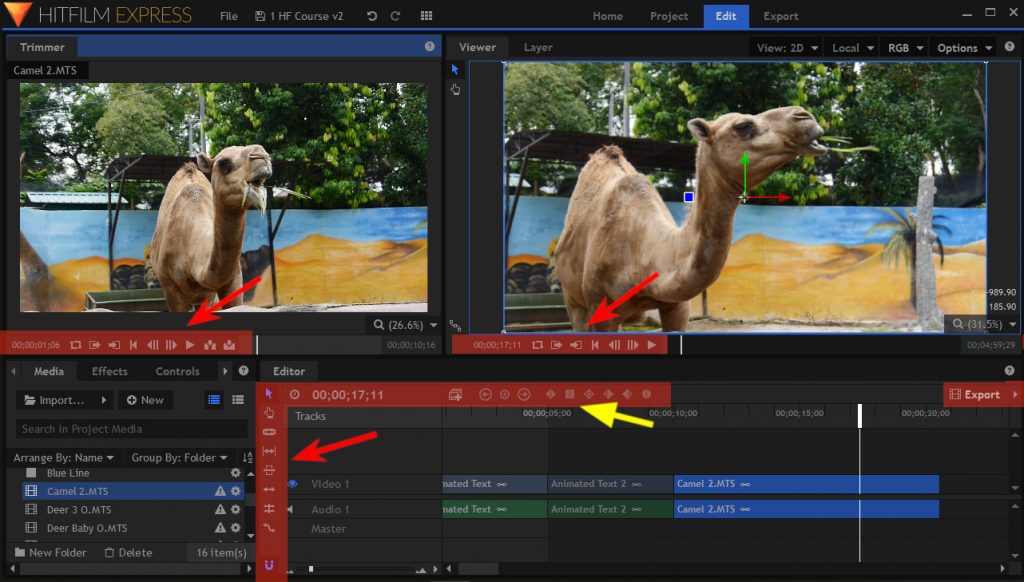
Tools in the different menu bars.
Basic Editing
To edit, you can:-
- Select the clip you want
- Trim it using the in and out points
- Insert or Drag from the Trimmer onto the Editor
- In the Editor, you can re-trim using Trim pointers. Trim pointers looks like { or } as you hover over the beginning or the end of a clip.
The slice tool allows you to cut a clip. The selection tool allows you select a section to move, or to delete.
Transitions
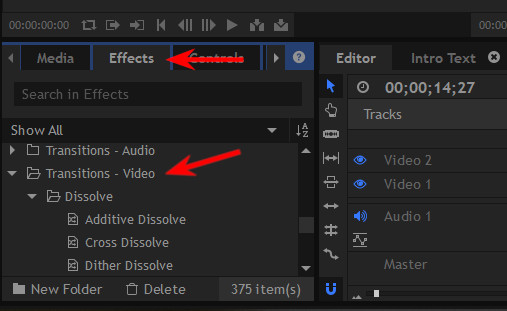
To create transitions between clips, go to the effects Tab in the Media window. Select and drag a transition effect and drop it between 2 clips. A good option is to use the Cross dissolve effect. Look for it in Transitions-Video > Dissolve > Cross Dissolve.
Create Text Or Titles
Update - HitFilm Express now has the ability to add text directly on the Timeline. That way you don’t need to create a composite shot if you just want to insert some simple text.
Click on the “A” button next to the viewer, a box opens. Type the text you want and you can see it show up on the Timeline.
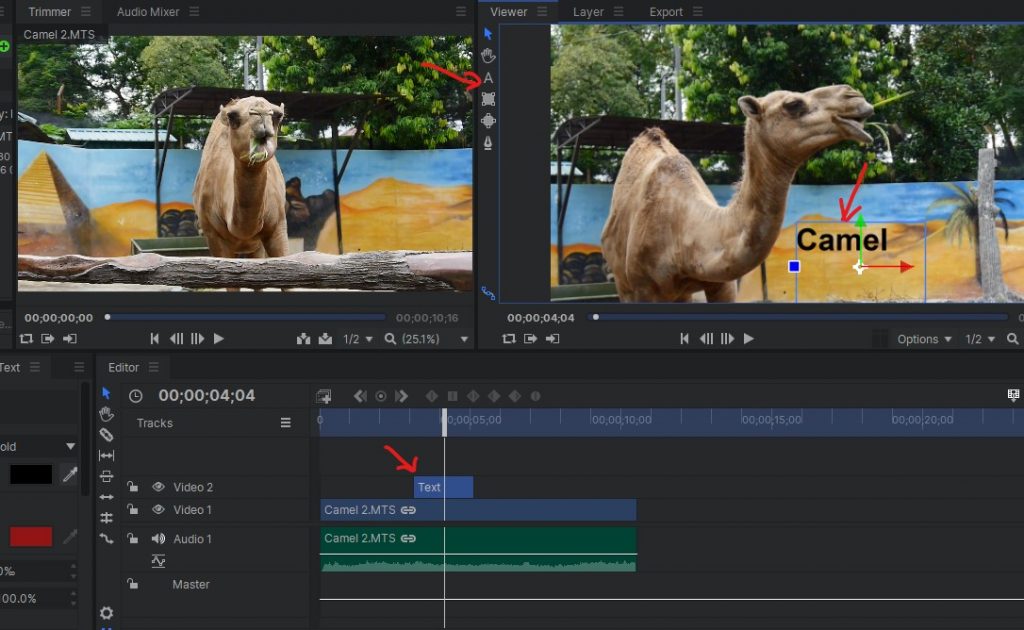
The other method requires you to create a composite shot. Creating a composite shot gives you more option and is a better method to use especially if you want to create animated titles.
To create text using composite shot, in the media panel, click on New > Composite shot. Or you can also use the keyboard shotcut Ctrl + Shft + N.
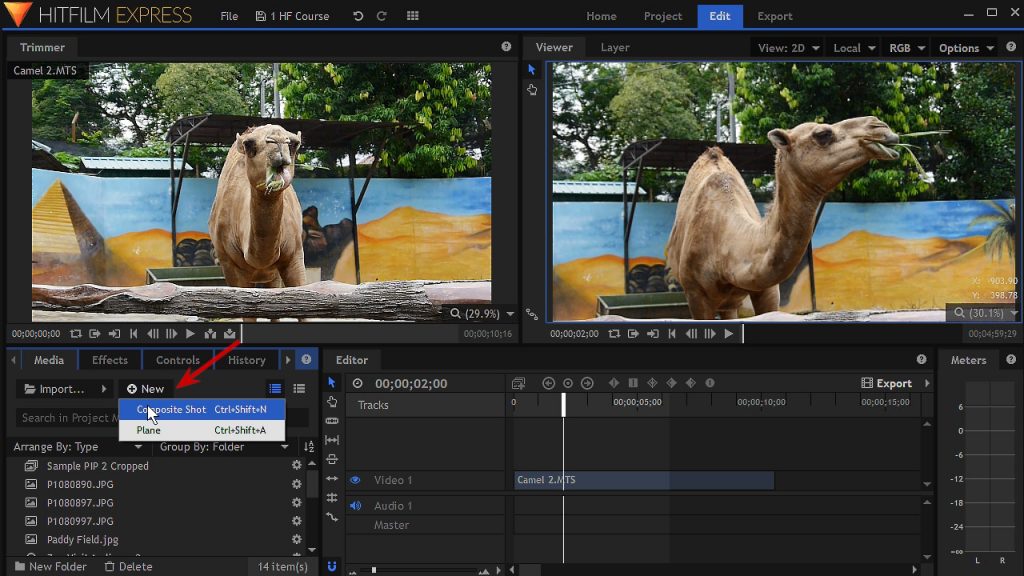
Name your composite shot for example Text Composite Shot 1. You can leave the other settings as it is. Click on Ok.
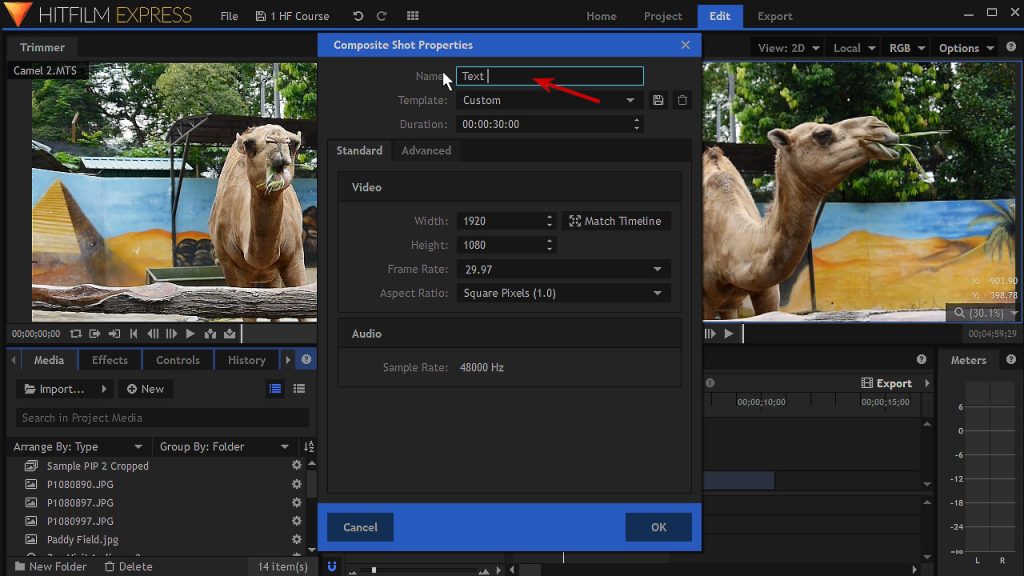
Give your composition shot a name.
Next with the Text Layer selected, click on New Layer > Text to create a text layer.
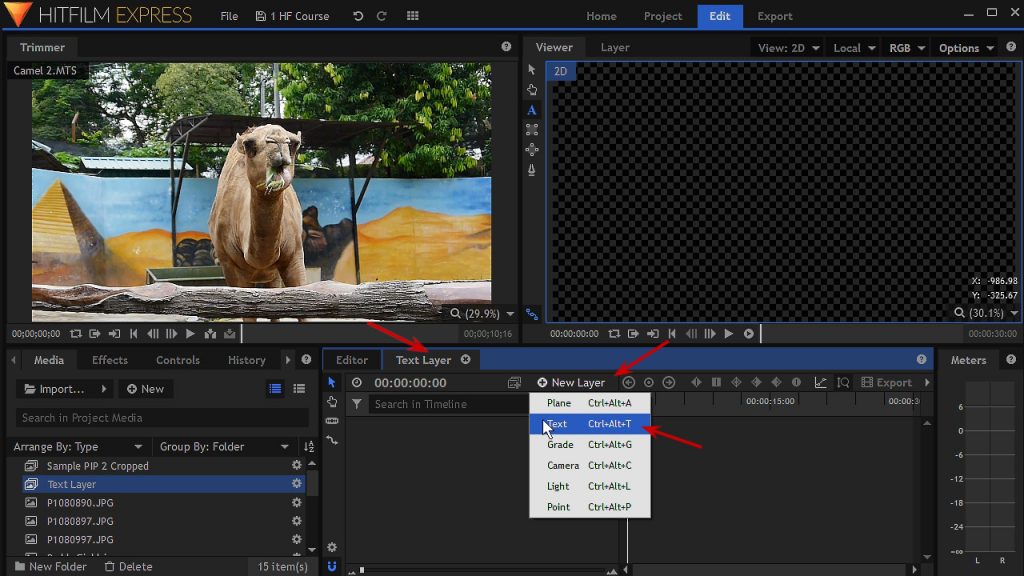
With the Text Layer selected (circled in yellow),
- click on the “A” to select the text tool,
- move your mouse and click in the box. You can type in the text you want
- to change font, font size, color etc, use the Text tab in the Media panel.
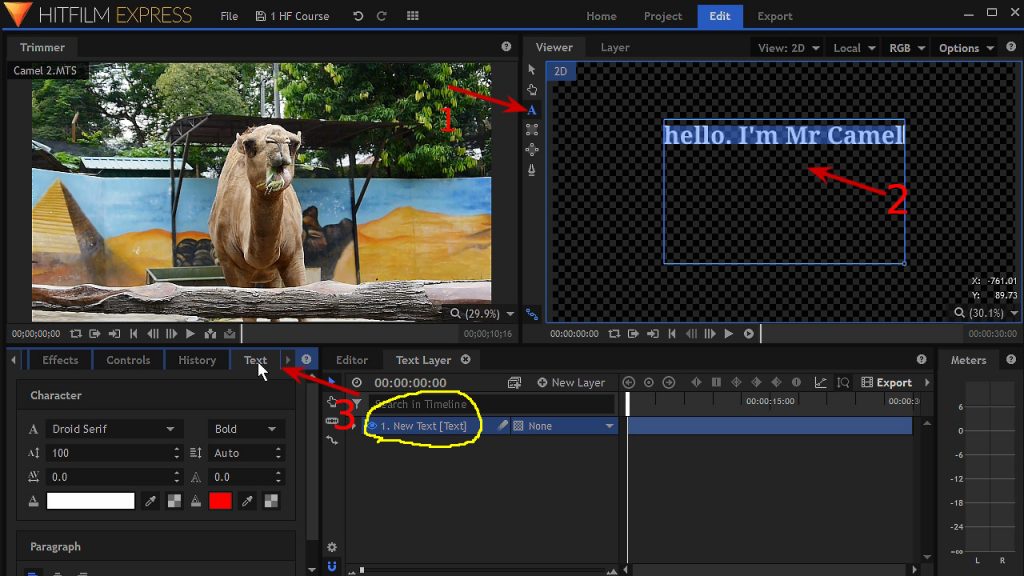
Once you are done, click back to the Editor. Then you can go to the media tab, drag your composite shot into a different track on the Timeline.
Export
To export your project, over at the top right corner of the Editor window, there is an Export button. Click on it and select export contents.
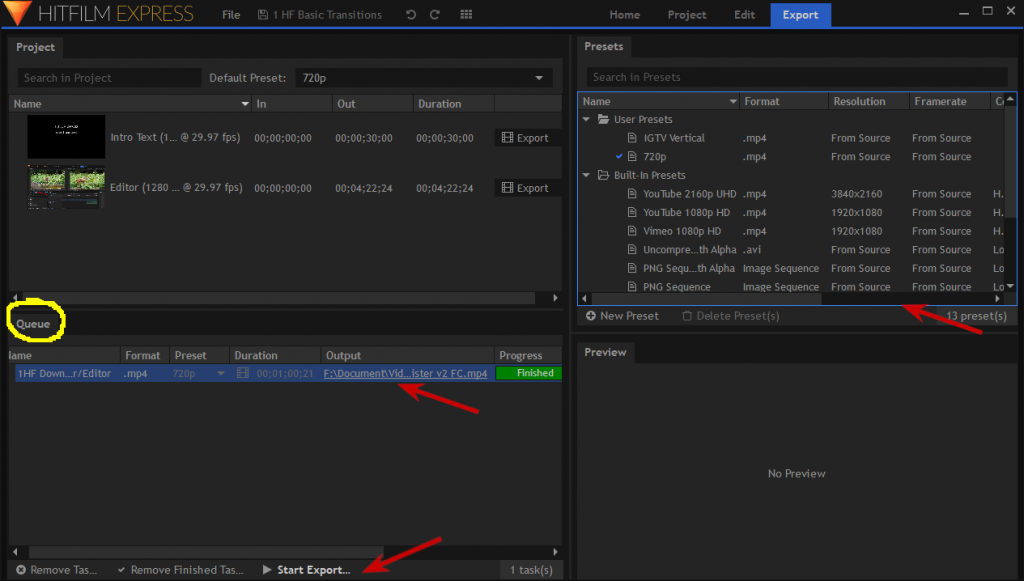
HitFilm will export the content that is on the editor timeline. A new window open and you are taken to the export tab. There you can select the export option, for example whether you want to export at 720p, 1080p or even higher resolutions.
The project panel lists all the project on your timeline including composite shots.
In the export Queue window, you can see your video project that is about to be exported or rendered. From the preset Tab, you can change the settings of your export for example for YouTube 1080p, or 2160 UHD. Clicking on the Output file, you can change the name of your video file, or the folder.
Once you are ready, hit the Start export button right at the bottom.
Video Tutorial
I hope this article gave you an overview.
With software, I think video tutorials works best. Do check out my video training courses.